These are this week's Sunday bake.


The Pantry Mama, How to Bake Sourdough in a Loaf Pan was my other attempt at FMF. I opted for half KA Bread flour and half hard white/hard wheat. I'm going to get a stronger starter going with just white flour the night before and feed in the AM and plan to mix/bake that same day. I did not have enough hydration so sprayed the dough while it rose in the pan...next time I'll hydrate more before the first bulk rise and really watch the autolyse. I think I went too long. It tasted great and had a nice texture, but isn't as tall or as springy as I wanted. Might add 20 g honey too this recipe also.


Made simple discard crackers seasoned a variety of ways on 1/12/25... These are very simple and savory, and would be good with hummus. Easy way to use up extra, I used whole wheat and white starter. They are powerful and have a lot of seeds, and I did feel like my chest was heavy after eating too many without drinking water! Yikes.
I used Little Spoon Farm's cracker recipe because it is fast, few ingredients, and as always, used a lot of discard! 200 g!


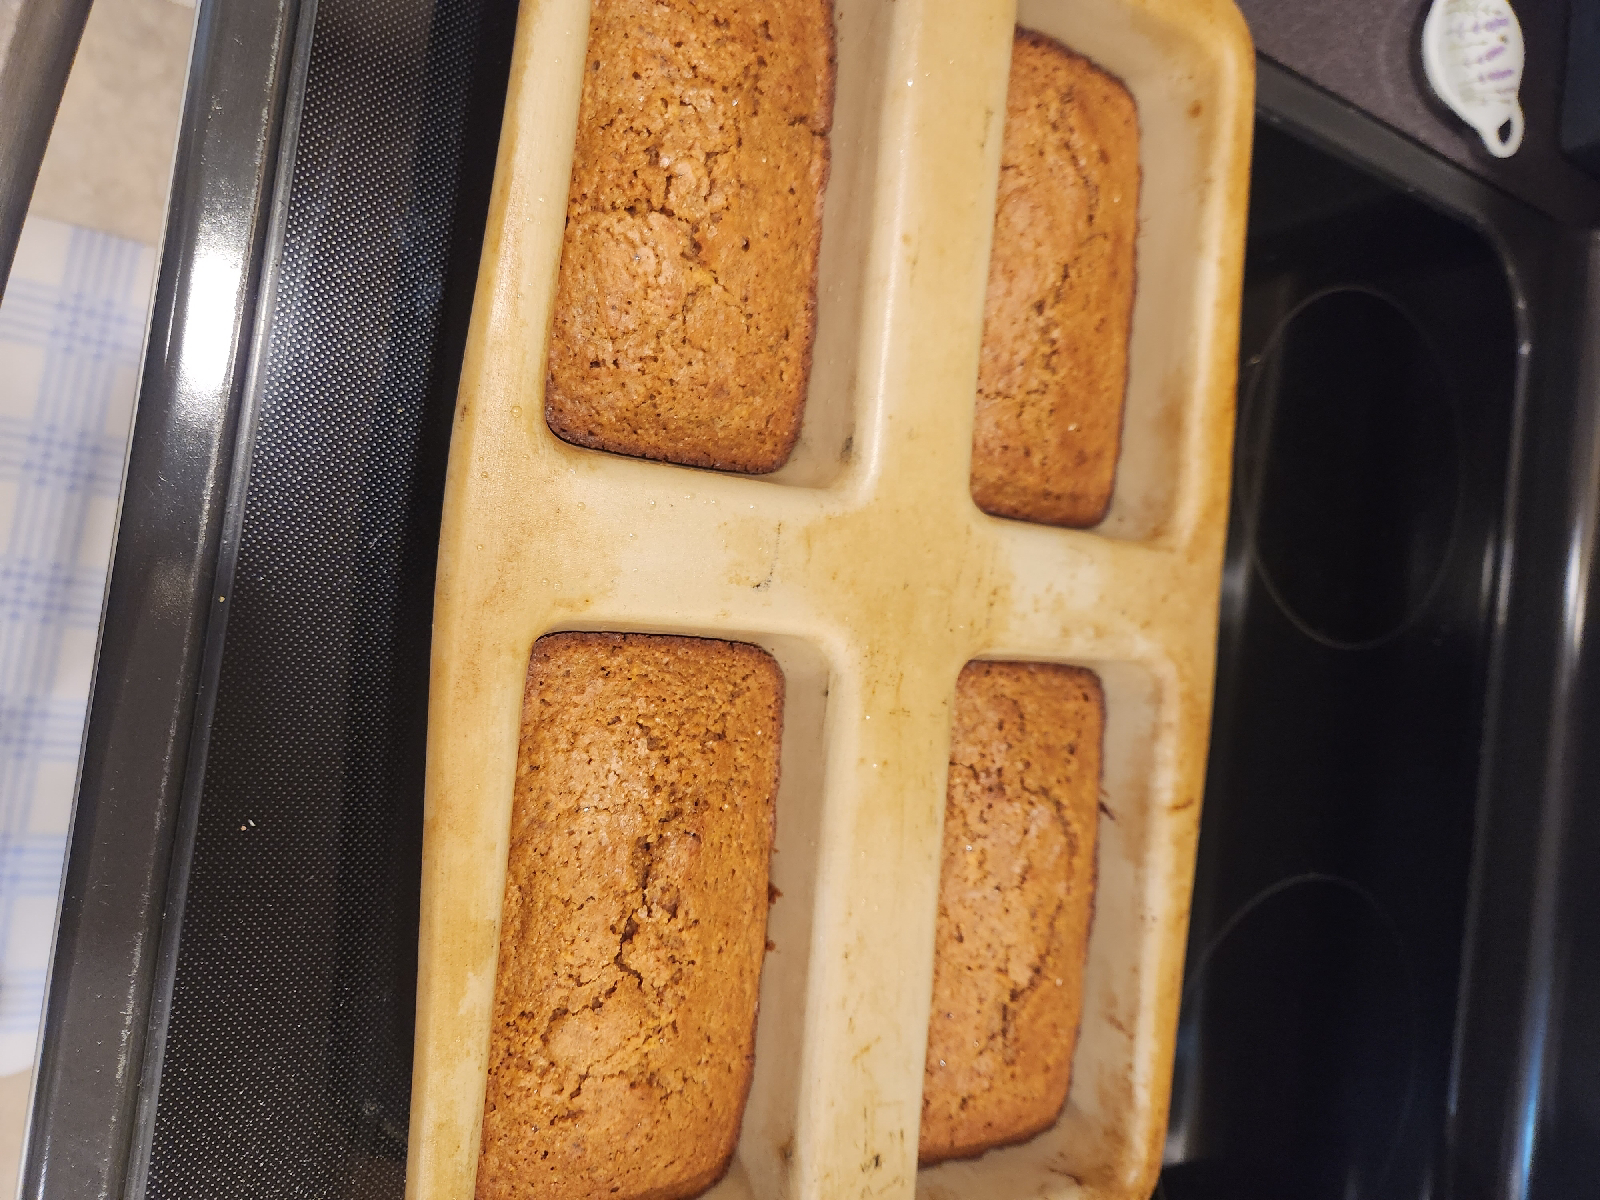
Grains in Small Place's recipe, made 2 small bread loaves in normal sized pans. I did not let these rise enough, or over fermented it...not sure. One loaf got weirdly puffy and the other was too flat. Different pans and the one seemed to be part of the problem. Won't use it again, will probably trash it honestly.
GISP's Sourdough Bread with FMF
Pet-peeve is that she calls fermentolyse, autolyse, which makes me uncomfortable, but I like this recipe b/c you can use olive oil instead of butter and honey instead of sugar... THOUGH, sugar might work better and I'll try it next time since I didn't love my results. I did use all FMF, started 1/11 and baked 1/12. Think I needed more active starter, will take out and feed at night before bed, then feed again early in the morning and get moving on the bread by 8:30 am if possible. Her dough takes 3-4 hrs on first bulk rise and mine took so stinking long I lost track b/c I was also making another sandwich loaf recipe the same day. I did finally put these pans in the fridge at 11:30 pm b/c I had to bake the other recipe.


I should have started to write this all down sooner, because less than 2 weeks in, I had forgotten this 3rd recipe of DO bread. I used my new banneton and thought the shape would be a rectangle. Shockingly, this is what came out of the DO! We ate this with butter, jams, and ham for dinner one night, oh, it was the pancake Sunday! So much sourdough on Feb 9th! Wish I could remember the recipe but it isn't in my mind. I started out making a few things back to back and then quickly moved to doing multiples at a time b/c of the big time lag. I don't usually have the free time I've had lately, so it was really fun to get to jump in and get rolling. Such a huge thanks to my friend who got me started!


So in my first post, I referenced discard. After feeding twice/day, leaving the starter out on the counter, I was becoming quickly over-run by discard and couldn't bear to throw it out. Some went in gravy and it was delicious, highly recommend this use. And I made my first batch of discard pancakes using Emilie Raffa's recipe. I'd printed another recipe but it used a lot less discard and had milk in it, and this was solely meant to use up as much discard as possible. It was our lunch on Sunday instead of the usual green smoothie.
Here's Emilie's recipe. She is The Clever Carrot and these were delicious. I'm pretty sure I used FMF or at least bought WW for these. I'll do again and write it down faster. These froze beautifully and reheated great in the toaster with a couple iterations. We did cut them in half after the first toasting. Still had a nice crisp texture on the outside like fresh.
Somehow I missed taking a picture of these but they were pretty thick and fluffy. This recipe can be made and let to sit overnight.
NEXT UP: SOURDOUGH DISCARD BROWNIES
At this point I felt like I was getting a handle on the use of discard, having used it in the sweet rolls, pancakes and gravy, so I did the usual and went rogue on this recipe by Kathy Cartwright. This produced a fluffy brownie with a nice tang, very good for brownie sundaes!
1/2 c. (1 stick) butter or marg., melted
1 c. sugar (can do white/brown; I did coconut and sucanat)
1 lg egg
1 tsp vanilla
1/2 c. sourdough discard (was nervous not weighing but this was the recipe, I used some white and some ww discard, ROOM TEMP)
1/2 cup AP flour (I did half ww bought and half bought white)
1/4 cocoa pdr, unsweetened
1/2 tsp baking pdr
1/4 tsp salt
1/2 c. choco chips (opt), I just had a few in a bag and sprinkled on top with some turbinado since I didn't use any refined sugar in the recipe. Gave a fun crunch to the top which was nice with the sundae toppings.
Preheat oven 350 degrees, grease 9x9 in. pan with bakers spray or parchment. Mix wet ingreds, mix dry separately then fold dry into wet gently and gradually. If adding chips, do it here, but you can put this in the pan now and sprinkle chips on top also. After you put batter in pan, smooth it out. Bake 20-25 min till pretty clean probe comes out. Cool before cutting. Important with anything sourdough it seems.
Very nice tang, will make again

I wanted to make 2 smaller rounds so the college kids could get to try this new endeavor. The crumb was much tighter and the exterior, smoother. I used a different recipe, this one started 2/5 and was baked 2/6. It is The Clever Carrot's Sourdough Bread: A Beginner's Guide recipe. As with the first loaf, I went for white fed starter and all KA bread flour. At this point I was actually using KA to feed my starter but realized I should use cheaper flour so switched after this round of baking. I was very happy with this recipe, good flavor, nice even crumb. I used a bowl with a finely woven tea towel covered in GF AP flour, and stored in the fridge overnight covered well this time with plastic/shower cap. Scored and baked right out of the fridge. Success!


I thought I'd posted pictures of my beginnings with sourdough, but alas, something happened with my phone I'm seeing because there isn't anything here about this. I want to catalog what I've done for my own records, and maybe it'll be useful to someone who comes along this way.
My starter was mature and a gift from a friend, 40 grams, and I was feeding a 1:1:1 ratio twice/day. I quickly ended up with a lot of great discard that was being saved in the fridge. It was robust and kept bubbling in the fridge actually.
I made sweet rolls for the college kids (orange marmalade and cinnamon) and added 100 or 150 g of discard to the orange marmalade dough and while a site I found said you didn't need yeast to use discard, that was dead wrong and when the dough didn't rise, I added in rapid rise yeast in a little water, worked it in, let it sit, and the dough did respond. The tang was really nice from the discard and I'll do it again.


1/4/25 was the beginning of my sourdough journey and the 5th I started the dough, then it was ready to bake on the 6th.
The first boule I made was 1/6/25 and the recipe used 125 g starter (white flour), 325 g water, 500 g KA bread flour, and 10 g salt. Mix the water/starter mix, add the flour/salt, mix, sit covered 1 hr. 4 sets stretch and folds every 30 min, sit covered on counter 3-8 hrs, shape and put in floured banneton. I put it in the fridge at this point, and it got hard on the top b/c I don't think I used a shower cap to cover but just a dry towel. Oops. Should have been plastic wrap or a shower cap.
It could sit in the fridge up to 3 days which is perfection if you ask me. I could easily get two batches of this going, do the one in a warmer setting for faster rise and bake the same day, then have the other in a cooler area to rise longer and then pop in the fridge for 3 days.
To Bake: preheat DO 475 degrees, score dough, place gently on parchment and lower into hot DO, put lid on and bake covered 30 min, uncovered 30 min or until 205-210 degrees. I went 209 degrees and cooled for many many hours. I was worried about gummy bread. It was beautiful and really had nice holes. Feel this is my go-to white bread flour free form boule and I'd like to try with half FMF (freshly milled flour). ***Since I'm working at not having discard, take 20 g out and do a 1:3:3 feed (I've never done this) or 40 g and do 1:1:1 and use when bubbly. Maybe take out small amount night before, feed at night and feed again in the morning...this will only work with a small amount of starter...maybe 10 g? Maybe 5 if doing a triple ratio...


If you are a hot chocolate lover, this recipe, loaded with cow's milk and heavy whipping cream, is sure to thrill you! I've substituted a can of evaporated milk for the heavy whipping cream at times. It is still great, but the original recipe really is the game-changer.

Tonight I decided to make a half batch in the smaller crock pot that was mostly dairy free and contained very little refined sugar. If you have dairy free chocolate chips on hand, you can make this totally dairy free! Those chips don't completely dissolve like dairy based chocolate chips, but they do work. I used dark chocolate regular chips with this version and even my dairy eaters thought it was good. Really, for the nearly 3 cups of non-dairy milk, you could do a variety of combinations. I don't think I'd go with almond since it has a pretty pronounced flavor. Place everything in the little crock pot and start out on high, whisk vigorously on and off during the first 30 minutes if you get time, then reduce to low. For faster cocoa you can keep it on high but stir every 15 min or so. On low the whole time it takes about 2 hrs to be ready, whisking just a time or two during those 2 hrs. Usually we want it faster so I do the high/low combo. Preheating the milk is an option as well to speed up the process.

For a quick vegan dinner that was a bit luscious, I went for a vegan gluten-free lasagna tonight for the Mr. and myself. I did the "cheese" sauce similar to this Minimalist Baker recipe, only since this was last minute, I used a package of 5 grain tempeh in lieu of the soaked nuts. This required more water to be added, about 1 cup. I also threw in a few sesame seeds for added nutrition, but do think that gave the sauce a little bit of a tahini taste--just a smidge.

I used a bought no sugar marinara instead of my usual bolognese sauce, and layered red onion, mushroom, spinach/arugula, yellow peppers and shredded carrots on top of the noodles, followed by the tempeh 'cheese' sauce (mixed in the Vitamix) which was sprinkled with Bragg no salt spice mixture and more nutritional yeast. Only one layer had the spinach due to volume restrictions in my 8x8 pan. Here's a picture of some of the ingredients needed. Not shown are the Bragg spices and the marinara sauce.


Cabbage is an excellent side dish when you want a lot of volume with little fuss. I used to primarily eat it with pork butt, potatoes, green beans and carrots all steamed together. Then cabbage became a soup staple for many a winter indulgence. Now, it has advanced to this: Sauteed Cabbage . You can use all green cabbage, or if you have some napa leaves, those are a tasty addition. I didn't add fresh thyme as the picture on that post shows, but did use cast iron and it turned out great. Half a large head of green cabbage and about 10 napa leaves filled a standard sized cast iron and fed 4 people, as a side.
This is a good accompaniment to Momma's Healthy Meatloaf. For the meatloaf, I shredded yellow squash, carrots, mushrooms and red peppers--sautéed them all and used only the veggies, not the liquid. I also put a little ketchup in the meat mixture, used whole oats in lieu of whole wheat bread crumbs, added plenty of black pepper, and topped with bacon strips for cooking. I cooked at 425 degrees for 25-30 min and made two. One to eat fresh and one to freeze. Mixing it all in the Kitchen Aid is a time saver.
Hope you try it!

For months it has been difficult to find the pita bread we prefer. Prior to covid, we usually found it at a retailer for just over $1 per 5 pack. It was whole wheat, low calorie, and tasted good enough. Not finding it for weeks and weeks led to going to a different brand that was not as healthy, and then finally when that was no longer available, to a more expensive store and a yet another brand. The cost has gone up each time we've made a change.

You can find the recipe here. I used less than 4 cups of freshly ground flour and rolled them out thinner than stated in the recipe. All but the 3 I forgot to time rose nicely--did better on a metal pan than a baking stone as far as rising due to the rapid heating of the metal.

There are many ways to skin this cat. You won't find our variety at a retail store, but it is packed with nutrition. I share it and bid you, good health!


I think it is kind of funny how vegan dishes will borrow their traditional counterpart names and just add 'vegan' to the front end. I guess it helps battle confusion, but it is still funny to me!
This dish turned out pretty tasty. I took a picture when a lot of it was gone since I was debating on sharing it, not due to taste, just time....
Vegan Eggplant Parm for Two:

You'll need a medium eggplant, 2 portabello mushrooms, Italian breadcrumbs, non-dairy milk, no sugar added pasta sauce (I used Simply Ragu), nutritional yeast, vegan mozzarella shreds. Of course, substitute what you want based on how you eat. This can handle gluten free crumbs or dairy if desired.
Peel and cut the eggplant while baking the portabellos (just put them on a cookie sheet at 350 degrees till not watery--about 20-25 mins). I cut the eggplant in half lengthwise and then slice it. Dredge the eggplant in non-dairy milk then coat with breadcrumbs. Lay on a cookie sheet sprayed with non-stick spray and then lightly spray the tops of each one. Bake in 350 degree oven for at least 20 minutes or until soft. I just eyeball this as I keep moving forward with the other meal components (since often I'm making a non-vegan dish simultaneously).


The kids had a simple baked ziti with whole wheat noodles, a grated yellow zucchini, beet greens from 3 beets-finely chopped, ricotta/cottage/parmesan cheese, nutritional yeast, bought marinara sauce.

I love Thursday's. It is always a sleepy morning because of church on Wednesday, but it is a day without necessary running, so quite nice.
Dinner was CAVA at home. It consists of a variety of greens, a lentil mixture of some sort (this one was onion, mushroom, bell pepper, wild rice and seasoning), roasted vegetables, pickled onions, sauteed vegetables, feta, hummus, sauces/dressings. I generally make a lemon herb tahini. Sometimes I will pickle cucumbers or have tomatoes diced with seasoned cucumbers. Here are a few of our plates.


